Software Reviews
Video Explosion Deluxe by Nova Development
Reviewed by Laurence Fenn
I started to review this video editing software on my old Pentium II 233GHz PC running Windows 98SE, but I recently bought some new hardware and built an Athlon XP 2100+ 1.7GHz running Windows 2000. I was using the same video card, an ATI Radeon DDR 64 VIVO, which worked fine on the Windows 98 system. However, when I loaded the software on my new Windows 2000 machine, the software refused to run, crashing the machine after the splash screen (and Task Manager could not be used to terminate the application). I had visions of the software not being compatible with Windows 2000 (but according to the documentation it is) or my Athlon Processor, but after searching the web site and sending a technical support email, I received a reply suggesting that I reduce the hardware acceleration setting. This fixed the problem, so there must be a conflict in the Windows 2000 drivers for my video card (and I downloaded the latest ones from ATI before building my PC) as I had a similar problem with Sound Forge 6.0.
The program itself comes on one CD, with 200 MP3 music themes, 750 backgrounds, animations, 300 fonts, 1000 sound effects and storyboard templates. A second disc comes with 250 video clips (352x240 NTSC format) and MyDVD, a DVD authoring program. The third disc comes with video clips in the NTSC DV format, and a fourth disc is a DVD with 4 Gb of hi resolution video clips.
Video Capture
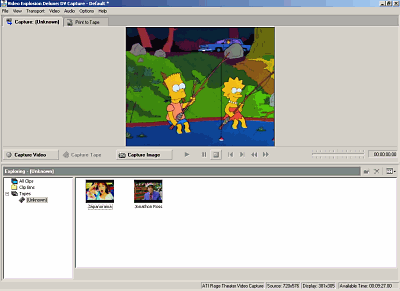
Unless you are only going to use existing clips, you are going to have to capture video footage. Even before I had my material ready, setting up the program had a few problems. The capture video settings always default to 320 x 240, despite setting to 352x288 and PAL in the project settings. Even if you set the PAL settings under the video capture options, and you then view a capture video, when you switch to the capture tab, it does not keep the setting. For Video CD the PAL format is 352x288, and for the NTSC format it is 352x240. The default setting of 320x240 seems to be a 'multimedia setting', which is fine if you are not going to produce clips to put on to CD, the program should remember your preferences.
By default, the preview audio is enabled, which gave a feedback echo effect. This happened with the record setting on my SB Live mixer on Line In, or 'What U Hear'. By switching the preview off, everything was fine. I could still hear the audio as I normally would through the mixer. Whether this setting was meant for a different type of sound card I do not know, but it was a frustration, even if it was noted in the read me file.
Depending on the amount of hard disc space you have (and you always need a large amount of space for video capture) you might want to change the format of the footage you capture. Unfortunately the format of the captured video is always AVI, and you cannot change it. With the ATI capture program that came with my video card you can select AVI, MPEG-1 or MPEG-2. Even with other video editing software you can select the format, from uncompressed AVI files (good quality, but very large files) to MPEG-1 (not as good quality, but smaller files).
The capture process was easy enough, started by clicking on the record button. The length of the capture is displayed during the capture as well as any dropped frames (depending on the frame size of the capture and speed of your hard drive/processor). You can also capture still images, which are saved as JPEGs, although you can untick a selection box to save as a different format. Unknown (unnamed) clips are added to the media pool, and area on the main program page where you can drag and drop your video, but as soon as they are named, they are removed unless you decide to add them to the media pool by a right hand click option. On the main page along side the media pool you also have tabs for transitions, Video FX, Text & Backdrops and Explorer.
Time Line
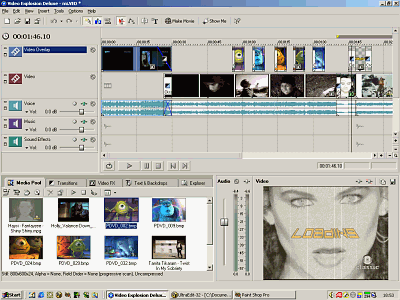
In the timeline view, you have Video Overlay (for text, pictures or video), Video (the footage itself), Voice (audio from the video), Music and Sound Effects. When you drag a video file from the media pool, you can place it on either of the video lines, and before you release the mouse button, place the audio on any of the audio lines. When you delete a clip, it doesn't delete the sound, so you can place different video footage on top.
There are a variety of transitions you can use for video or pictures, from zoom, backdoor, page curl and others. Each type of transition has a several variations, and certain settings can be changed depending on the transition. Adding a transition effect to a picture on the video overlay usually works (e.g. to fade the picture in on top of the video), but sometimes it refused to add the effect. I had four pictures set to fade in, stay for a second then fade out. I dragged the transition onto the clip for the beginning and end, but for the second picture, the program refused to add the effect to the beginning. I deleted the picture and added it again, and it then worked. The program also seems to get confused when copying the transitions you are applying. I created a video title sequence with a pictured background, and text appearing in the middle of the screen, and then zooming away to the distance, similar to The Simpsons titles. I had four text titles, and once I had the first one done, I copied the clip and pasted it further down the timeline, changing just the text. When I created the video, some of the text zoomed in, instead of zooming away.
Video FX only apply to the whole clip. It says that you can vary the amount of the video FX between the beginning and the end, but I was trying the old film effect (brown, with scratches and wobbling video) and could not start with the effect and go to regular video. The nearest I could get was to use 'split event', which divided the video into two clips. The effect stops on the second clip, but straight away, without a fade. There is no control over the exact duration of clip other than dragged the ends of the clip. You need to zoom the timeline in to get an accurate time, instead of inputting a number.
There are plenty of effects and transitions, but no explosion style transitions, like Video Wave has. The way you enter the text for titles can be confusing, and does tie you to the preset styles. I thought the timeline display would be easier to use compared to the storyboard style of Video Wave, but it seemed cluttered, unlike Ulead Media Pro or Adobe Premiere, who both use a timeline method. You can right hand click on an audio track and add a volume or pan envelope. You then have to right hand click and choose to add points, to vary the volume or pan position. This was not a simple interface, and when fading between two video clips unnecessary, as any two clips that merge into each other can be set to cross fade automatically. This can lead to a complex display with all the clips on the same track.
You can play the video from the timeline, and the effects are nearly at real time, so you can see how the clip will look in the preview window without rendering the entire project. You can also select to render only part of the project, if you wish.
Make Movie
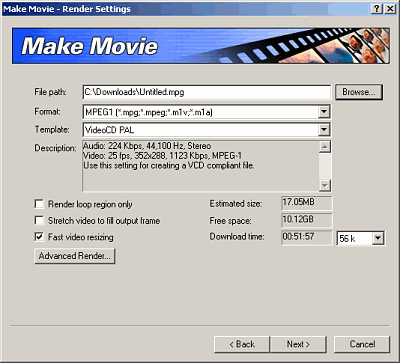
When you decide to render the video, you have a small wizard to help you with your choice. You then have a progress window, which is on top of the wizard. This means you have a very messy screen, as the timeline is below, trying to show the preview as it renders the project. Once the rendering is complete, the wizard allows you to play the file (in Media Player) or explore the folder where it was created.
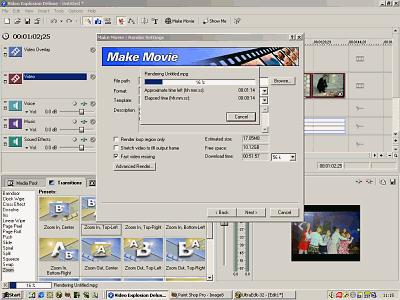
Irrespective of the format of the project, you cannot have different formats of files in a project if they have different frame rates. I added a couple of MPEG files, some were NTSC 29 frames and some were PAL 25 frames. The video frame size can be stretched to fill the screen, but frames rates are not converted. This resulted in a blank screen every so often in the final rendered file, but played fine when the project was played as a preview from the timeline. Unless you were switching between formats this would not be a problem, as all of your clips should be captured in the same format.
You can burn your rendered clip straight to a CD (if you are absolutely sure the final version is exactly what you want) but the program did not detect a CD-Writer on my system. I have an LG 10x CD Writer, which is recognised by all of the CD burning programs I use and Windows 2000 does not need specific drivers to recognise a CD-ROM drive. You can also publish to a web page, but you should remember that large video files would take a long time to download.
The final curiosity was on the About screen, which has a tab marked 'computer'. On my system it reported the platform as Windows 98, Version 4.10.2222. I was actually running on Windows 2000 with Service Pack 2. This doesn't affect the program itself, and I presume it is there to help support diagnose problems.
The program is aimed at the home user and is shown to be a family product. The six colour pages on the front of the box show all the features of the product and what can be achieved but it is all American based. The images are all of American families, the clips are in the NTSC format, and although it supports MPEG-2 as an input (and output format) you need to register in order to use that particular format. You can also use MPEG-1, AVI, MP3, Quicktime MOV and several picture formats for input, but the manual does not recommend using MPEG as the quality maybe poor. Output wise you can use all of the video formats mentioned, plus RM (Realvideo & RealAudio), WMA and WMV. Rendering an MPEG file that used MPEG files in the project does produce a poor quality file. Even if you are not creating a Video CD compatible file, you have no control over the Ligos GoMotion MPEG encoding (the name is actually spelt wrong on the splash screen).
Pricing and Avalibility
From the high street, mail order or direct from Guildsoft (http://www.guildsoft.co.uk). Expect to pay around £65 - £70 including VAT.
Back