Software Reviews
Greetings Workshop by Microsoft
Reviewed by Laurence Fenn
The new trend in software is greeting card programs, and this one by Microsoft, in association with Hallmark, is one of the latest. Running on Windows 95, installation of the program takes a while, and 30Mb of hard disc space. After a brief question as to whether you want a shortcut to the program on your desktop, it goes on to install the program and over a hundred TrueType fonts (107 to be exact). When you come to un-install the program (from the Add/Remove icon in your Control Panel) the fonts are not removed, so you are left with 6Mb of extra data.
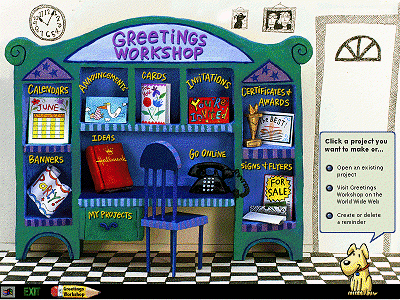
When you first run the program, you see a log in screen. You can start the program as a 'guest' or add your own name, with a level of Beginner, Intermediate or Advanced. The only reason I could see for this was that it can automatically add your name to your design. From the main screen proper, you have a cupboard with the different types projects you can design, introduced by a dog. He is an animated character that asks a few questions, sits down at a desk with a pad when you are making your design, and is generally a helping guide to your creation, mainly for the kids. He can also ask if you want to open a design, visit the WWW site (http://Greetings.Workshop.msn.com) or create or delete a reminder. The reminders allow you to enter some free text for a holiday or special occasion, and once you have selected the date, you can specify how far in advance you wish to be warned about it, be it a day, two days, a week or two weeks.

You can choose on this screen:
Calendars - choose a one month, one year on a page, or a one year on twelve pages calendar. You then choose a category of blank, Family/Kids, Graphics/styled, Nature or Special Interest. It then creates your design and asks what year you want the calendar for, whether you want the day of the week to start with a Sunday or a Monday and if you want to mark the Sundays. You can then print the design or make changes to it (when it then saves your design). When I tried this option I had a slight problem with the months, as by default it placed the names on top of the day indicators, making them impossible to read.
Banners - Celebration, wishes & greetings, signs or I want to do it myself. Choose from the previews given, and enter the text you want.
Announcements - choose from General, Wedding/Marriage, New Baby/Adoption, New Pet, Moving/New Home or Graduation. You can then preview the designs, and change the text before printing.
Cards - Friendship & Just For Fun, Get well & I care, Wedding & Anniversary, Baby & Pregnancy, Love, Birthday, Congratulations/Good Luck, Thank You, Sympathy, Valentine's Day, Mother's Day, Father's Day, Christmas, Jewish Holidays, Other Holidays & Occasions, Photo Cards.
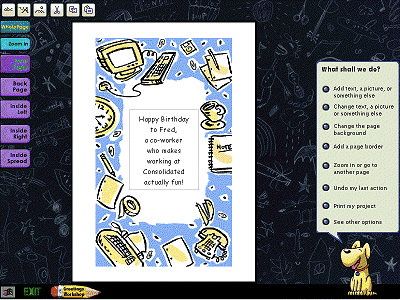
With the cards project, you can design the front, inside, and back. The back design automatically adds a Greetings Workshop logo with a 'created for you by ' note and then your name, or the word 'me' if you logged on as a guest. You can choose the wording from a limited range depending on the type of card, which are all previewed, as with any of the other projects. When you choose to make changes to the design you can then change the text to anything that you want.
Invitations - choose from Birthday (Adult or Kids), General, Theme Parties (Adult or Kids), Wedding Shower, Wedding, Wedding Anniversary, Baby Shower, Graduation, Halloween, Christmas and New Year. As you can now probably guess from the options given, the program is geared towards the American market.
Certificates & Awards - Home, School, Business, Sports and Clubs. No questions asked here, just a selection of previews and then the four or so boxes containing the text of the design.
Signs & Flyers - Invitations, Greetings and Newsletters, Signs and Notices or Hallmark Mailing labels. The last option just produces a sheer of labels, designed to fit on one of four Hallmark label sizes. They maybe common in America, but I've heard of them in the U.K. Avery labels would have been a more common choice.
Ideas - this is a fancy help file with ideas on what to design, or how to improve a design. For example:
Adding hand work to printed cards
So you've used Greetings Workshop to create the perfect card-now what? Now you can make it even MORE perfect by adding your own special touches.
- Add some color. No color printer? No problem. Grab some crayons, pencils, pastels, paints, markers, those nifty watercolor pens-basically anything with color-and brighten up the designs yourself. You set the mood-crayons add a playful touch, colored pencils a soft look-and best of all, you can color outside the lines.
- Add some sparkle. Check out the rubber stamp selection in a card shop or a craft store-both usually have embossing powder and glitter that sticks to ink. Or try plain old sequins and glitter with glue (used sparingly, to avoid sparkly dandruff)-they're both low-tech ways to look high class.
- Lace it up. Dig through your sewing scrap box-bits of lace, ribbon, cloth, rickrack, doilies, and appliqués make romantic additions to cards with floral designs, bunnies, and other country, Victorian, or cute artwork.
- Two words: googly eyes.
- Tie one on. Punch a little hole in the upper left hand corner of a folded card and tie on a tiny satin ribbon that picks up a color in the card. Or cut a piece of raffia or thin gold cord three to four times as long as the card is high; tuck the raffia or cord in the card bookmark-style, then tie the excess around the outside of the card.
- Make it simple and elegant. For the easiest finishing touch, use a gold paint marker to outline a design or trace a letter.
- Use pretty paper. Want to use some paper that's too chunky to feed through your printer? Print a card and lay it face down on the paper, then cut the paper a little bigger all the way around than the card. Fold the paper the same way the printed card should fold. (If the paper's really thick, make it easier to fold by scoring the fold-lightly drag a scissor blade or art knife across the place where you'll crease it.) Now cut out the front and inside panels of your printed card and glue them in place on your special paper.
- Mix and match it. To give your card a matching (or unique) envelope, find a regular envelope that's the size you want and carefully pull it apart. Trace around the envelope parts on the paper (or magazine page, grocery bag, or comics page) you want to use as your envelope, cut the envelope shapes out, and glue them together to form a truly memorable package for your card. (Hint: put the card inside your envelope before gluing that final flap.) If the paper is too dark or funky to write the address on, make the post office happy by adding a Hallmark Connections mailing label or by gluing on a rectangle of light-colored paper with the address information.
That's just a start. Once you've done a few, you'll think of a dozen ways to make your cards one of a kind.
As you can see from the spelling and the style of writing, this is an Americanised program. The choice of Jewish holidays also indicates that this was not a European product. I was reviewing the August 1996 Final Build Beta, and it may be different to the version finally released.
Go Online - visit the WWW site to get more ideas
My Projects - once you have created your design, you may want to change it. It's only at this point that you can save your project. Clicking on this drawer will allow you to re-load a previous design.

The design screen has six icons on the top which are for adding text, adding fancy text, adding a picture, cut, copy, paste. The fancy text is another way to describe the Word Art feature, with simple controls to determine the shape, rotation and colour of the final text. Selecting to change the font shows the available TrueType fonts from a list written in each of the fonts, as in Works 4.0 and the new Word program. You can zoom in to get greater detail and accuracy in placing your text or designs on the card. At any point of your design when the program asks you questions, you can go back to the previous question and answer it differently. If you click on the dog at any time, a hand appears and then strokes him on the head, before disappearing again. This is of no use whatsoever, but he does look cute!
Without the packaging I couldn't tell what age group the program is aimed at. It's not simplistic, and it can get quite complex, so I would say that anyone from ten or so upwards could use it. Even though the disc contains 195Mb of clipart, 6Mb or 107 TrueType fonts, and 159Mb of design templates, you may what to use your own material. The program is compatible with Microsoft's Picture it!, and also comes supplied with two hundred examples of pictures from a company called Photo Disc. They specialise in high quality scanned photographs and have over a hundred different CD-ROMS covering many subjects. The program specifies that you should not remove the Greetings Cards CD from your drive when the program is running, but this is probably overwritten when you import a scanned photo or use a photo CD in your drive.
Alternatives are Card Shop Plus by Software Toolworks (£4.99), Print Shop Deluxe by Brøderbund (29.99).
Review first appeared in ROM Newsletter of the Guildford PC User Group in April 1997 (Vol.7,No.4)
Back
