

Software Reviews
CrazyTalk Animator Pro
Reviewed by Laurence Fenn
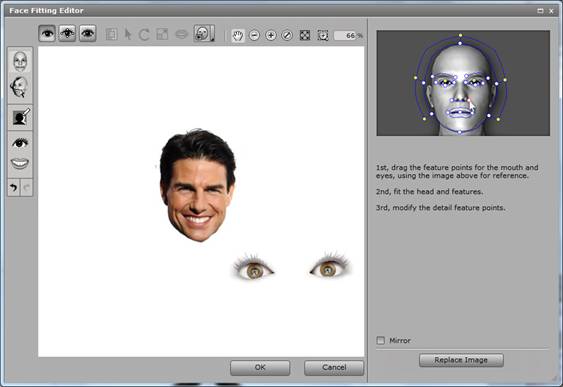
Crazy Talk Animator Pro expands on the previous versions of Crazy Talk by including full animation of characters as well as the lip syncing features of the software. Importing a head shot is the same as before and unfortunately the routine has not been improved upon for cutting out the head. You still have to paint out the background which can take a long time. There's no background remove feature like in PaintShop Pro but you can import a PNG file with the background removed to make it easier. It's the same when creating a body from a photo, and you need to have a picture with the arms out to the sides and the legs slightly apart. You won't be able to find a picture from the web and use that to create an actor as it's highly unlikely that anyone would pose in that position.
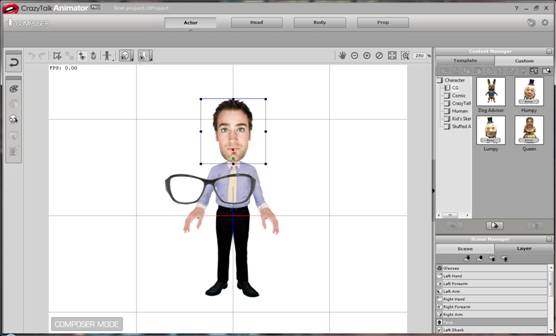
Running across the top of the interface, made up of shades of grey and white, is a panel of buttons to switch between Project, Actor, Animation, Scene, Special FX and Export. Below this are tools for transform, 3D mode, rotate and zoom amongst others while modification and animation tools are kept separate in an arrangement down the left hand side of the interface. On the right is the Content and Scenes window and the timeline is at the bottom of the screen.
You add elements to the scene from the library or any other image. Additional content packs can be bought from Reallusion. Predefined animations for the actor, from walking styles, dance moves or hand gestures can be dragged onto the actor and added to the timeline. It does not fluidly move from one action to the next, so when I started adding the dance moves from the library the actor jumped to each of the moves instead of moving the next position. This meant the animation did not flow and did not look natural. Mind you, the characters (sorry, actors) all tend to have large heads so they look quite unnatural as it is.
You can use the puppet mode if you want fine control over your actor. A selection of base animations for the head and body, like a frown or waving hands, are controlled by moving the mouse around as you record. Puppet mode has a half-speed setting, so you have more of a chance to match your movements to the soundtrack, and you can move animations around in the timeline later.
Now that you animate the character in a scene as well as the character itself, you have two editing engines, Composer Mode (for the actor) and Stage Mode (for the animation). This can be confusing if you were use to the previous versions of the software as you only had one mode to deal with before.
There's a Z-depth layering and 3D View Object Management which you can switch between. Now that you can animate with a stage and props, you need to be able to adjust the z-depth of the objects. I had expected an option when you right hand click on an item to bring it further forward or backwards, but instead I had to change to the 3D view and then drag the object in the z plane to change the depth. This was frustrating, especially when I was just trying to add a pair of glasses to a character. Every time I edited the glasses, it did not stay to the same scale as the character. I had to move the glasses way off line in the editing mode to get them to be in the right position when the character was animated. Then I found the glasses did not move with the character because of the way I had imported them. It took a while to attach them to an actor and I had to restart several times as making changes to previous mistakes seemed difficult to correct. In fact, there were a few bugs like this in the software. When editing an actor you can change the head by replacing the image, but when I did this, I had the new face and a pair of eyes left floating. It may have been that I hadn't selected all of the facial features, but it wasn't made very clear.
You can change parts of the actor, and I managed to give my character a new waistcoat fairly easily, but despite the demo videos included, it's not as easy to as it makes out to be.
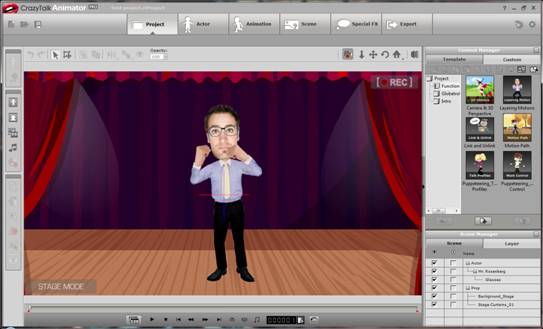
Projects can be started with preinstalled characters, or actors (aka avatars) can be built (faces, body parts etc.) from your existing photos. Alongside the puppeteering, the backgrounds to the animation can be enhanced with props from the existing library or manufactured from any image of our choice.
Defining your own props and actors from your own photos can be slightly time consuming, as each individual aspect of a character needs to be accurately defined for the puppeteering and facial animations. For the facial animation the editing process is much as that for CrazyTalk with features defined by a series of focal points. However, once the character has been defined, the process of animation can be undertaken using either a series of templates that easily animate the character. Editing of any animation is done on a timeline, allowing frames of animation to be extended or looped. The main difference between the standard and PRO versions of the software is that the PRO version offers much better features with respect to the puppeteering, allowing a much greater range of movements of customisation to any actors.
When you want to export your animation, the program supports WMV, AVI, Gif Animation (although you won't get any sound with this), iWidget or popVideo formats. I hadn't heard of some of these formats, the latter being another product from Reallusion. When I chose AVI, I then set the various options for the frame size. The preview just creates a bitmap of the stage and opens it in your default graphics program, which I though wasn't really of much use as you can see the stage in the program. I finally got to choose the code to create the AVI with, and I used DivX. As I had imported a song as the soundtrack, to make the actor dance to, I realised that I hadn't animated the entire song. When I clicked to cancel during rendering, the program gave me the option to save what it had created already, cutting the audio, which for these test purposes was fine. However, the resulting video file had no picture and the audio wouldn't play, so obviously cancelling before it has rendered the entire scene does not create a valid file.
I thought I could fade the background music after the last part of the animation, but the timeline did not give me any option like that. It took me several clicks to find the music that I had imported, and the timeline floats in a window on top of the rest of the screen instead of being integrated into the interface. Letting the program render the entire AVI file crashed the program when I chose DivX, but did not when I used the XVid codec. To use the MP4 for PC codec you have to activate the feature. This takes you to the website, but not to the page that explains how to do this. After searching the site, I downloaded a PDF but this didn't give a URL. Only after I registered the product on the website did the Activate button work properly in the program, taking me to the correct page. A few error messages should have been shown rather that the default main page. The PDF was not right either, as it shows that you can register on the page it brings up, but the page doesn't appear until you have registered!
Animator Pro costs £116.42 whilst the standard version costs £36.64, both at Amazon. That's a significant difference in price. The extra features of the Pro version include Full-body photo fitting, Composer system - custom body parts, Advanced puppeteering control, Custom puppeteering profile, Custom sprite animation, Custom Facial motion, Advanced timeline editing - Copy, paste, move key, clip loop & speed control, Save custom motion clips from timeline (collect clip), Full Timeline Sub-track Controls (detailed tracks for body segments), Group/ungroup motion clip for advanced key-editing and Access to Developer Whitepaper for content design.
There have been two patches to the program and the changes are noted below:
v1.1 (3/3/2011, 125MB)
- Added: Layer editing in Scene Manager.
- Added: Save motion option with custom layer key.
- Added: Multiple props selection with merge function.
- Added: Flexibility on project timeline editing. Able to delete or insert frames into a Project.
- Added: Able to scale the window size for Face and Body Fitting.
- Added: New connection points to a character for auto snapping when exchanging content.
- Added: For the convenience of the users, we changed the policy to allow for up to TWO simultaneous installations on separate computers. The policy remains a ¡§single-user license¡¨. Permanent use on more than one computer will require an additional license.
- Enhanced: Action Menu Editor with full editing features including; add, remove, rename and sort.
- Enhanced: Better Performance on Switching Modules such as; Key Editor, Face/Motion Puppet, Character Composer and Load Project.
- Enhanced: SWF file compatibility.
- Changed: Content purchase entrance now moved from Backstage application to the Reallusion City Marketplace.
- Fixed: Prop layer order issue.
- Fixed: Sound issue of videos exported with popvideo prop inside.
V1.11 (18/4/2011, 38.6 MB)
- Added: Support for Virtual Machine on Mac.
- Added: Supersampling in export function. (elimination of jagged/pixelated edges)
- Fixed: Crash issue when applying Facial Components from the Face Library.
- Fixed: Motions disappear after ungrouping motions in the timeline.
- Fixed: Thumbnail display replacement issue in the Sprite Editor.
I had applied both patches before reviewing, so the DivX codec bug has not been fixed yet.
Back