

Software Reviews
Crazy Talk 5 by Reallusion
Reviewed by Laurence Fenn
Crazy Talk 5 is the Photo Puppet Moviemaker software from Reallusion. I had tried version 4 a while ago, and was interested to see what improvements were made to version 5. The installation was a bit odd as it asked for a valid email address before installing any software (checking for an @ sign in the address). Then, after I entered the serial number it said it was checking it via the internet, but it didn't ask for web access through my firewall, which I would have expected. After it was complete, I checked for updates (as out of the box it is version 5.0) and there was a 25Mb update to version 5.1. The program takes you to the website to download the update, rather than starting the download itself. The new version adds a Live Update to the program as well as a few other fixes.
I should point out that I started to review the software with the copy that I won at the Christmas raffle. It was marked as just Crazy Talk 5 and I didn't know that there were two versions of the software. Only after twenty minutes of using the software I realised that there were features not included in this version. The manuals (which are installed separately as PDFs) do not mention this, so I was about to email support to ask why I couldn't something mentioned in the manual when I came across a version comparison page by accident whilst searching for an answer online. The main feature I was trying to access was making changes to the Timeline, where you can tweak the movements of your photo. This is not available in the standard version. I then got a copy of the Pro version and once that was installed all the features were there.
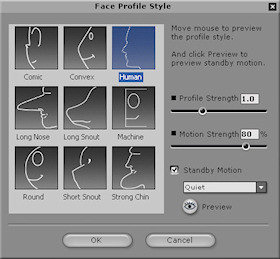
Like the previous version, you start with a picture of anything with a face. If the picture is too large it will be resized, and you can crop the image or rotate it. Crazy Talk then auto-fits anchor points for the eyes and mouth, which you can change if it hasn't got it right. Finally, you choose the profile of the face, which will affect the way it is animated. At this point the model is created and you can go on to animate it, but you can tweak the anchor points or use the Detailed Facial Mode (which adds more points on the mouth, eyes and face) to get a better model. There are separate shapes for the mouth, each eye, eyebrows, nose and head. I had a bit of trouble selecting the points, as sometimes it moved the whole shape instead of the individual point. Also, the head shape sometimes changes when you move a point from an arc to a straight line, making it difficult to get the correct overall shape. If your photo is of someone facing the camera head on, not smiling too much and without a lot of hair detail sticking out, then you'll get a better fit.
 |
 |
 |
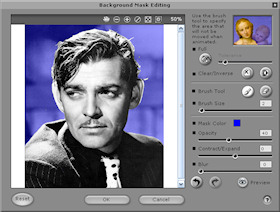
Setting the points on the face is only half the work, as you need to set what the background is. This stops the features behind or close to your subject from being animated when the head moves and also allows you to change the background to a different picture or a single colour. You do this by painting a mask onto your photo, and you can change the size of your brush, or change it to an eraser if you've painted something by mistake. There are a few other options to help you, but I would have preferred it if you could click on a colour and set that to be the mask. If your subject is on a plain background then this would save you from having to paint a mask. This mask method is use when you import objects to overlay on your photo, like a hat, or glasses or some other object.
It should be noted that no matter how much you tweak your model it will not look like a natural human (or animal, depending on the picture you imported) when it moves. The Advanced Facial Settings allow you to add new eyes, changing their size, brightness, contrast, hue, saturation and position on the face. You can add teeth to the image and choose from a range of sets, or import a picture of your own (not your own teeth, I mean your own picture of a set of teeth, although if you took a photo of your own set, you could use them). You can change the scale and position of the teeth, as well as the brightness, contrast, hue and saturation. On the Mouth tab you can alter the colour of the inside of the mouth. Quite why you would want to do that is a mystery to me. The last tab is called Lips, and you can force them to be closed if they were slightly open in the picture. You can also move the left and right corner of the mouth up or down. With all of this control you can make the model look quite unreal and that's before you've animated them.
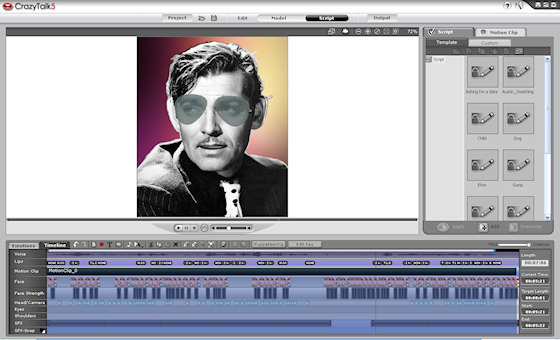
You then go on to the scripting page where the program tries to lip sync to a wav or mp3 file when it is added to your project. I found the mouth movements were rarely convincing but it could have been me expecting a perfect copy of what a real person's mouth looks like when speaking. You can add background music to the project, record your own voice instead of importing a sound file, or use the operating system's TTS (Text To Speech) to generate a sound file based on what you type in. If you import something sampled from a film and it has music in the background, the program will try to lip sync the music as it can't tell the difference between voice and music. If can find dialog that has just the voices, you can always add background music (mp3 or wav). If your audio source has extra sounds in it, then you will need to tweak the Timeline or manually create the lip sync. The voice track can be morphed using some templates (Genie, Monster, Robot, Pitch Up, Pitch Down) or modified using four sliders of Pitch Scale, Head Size, Robot and Echo. None of these changes affect the timing of the soundtrack; otherwise all the events on the Timeline would need to be changed.
The Timeline shows the voice sound track, then the lips track, with the phonetic mouth shapes. You can tweak this line or add/remove parts. You can also change the movements of your model by adding scripts provided, or using the puppeteering button. This feature allows you to move the character according to what you highlight on the face in the dialog. You can preview what your mouse movements will look like before you record them to the Timeline. You can record in half speed if you want to be more accurate and it may look better when played at full speed. The level of your movements can be adjusted, and each part of the face can have the movement limited. Doing a manual lip sync to dialog is more accurate this way, but I had to tweak the amount of control of the mouth down from 100 to less than 50. You cannot define the shape of the mouth this way, so you have to combine with the lips track to make the mouth shape change. You can also control camera movement and zoom, but you are limited to the amount of movement. I wanted to start my clip with just the eyes showing, but I couldn't zoom in enough to do this. Also, the character movement only works when you have replaced the background, otherwise you leave a black silhouette. When I tried to animate my niece's dog that was standing on the sofa at the time the photo was taken, I wanted to use the zoom, but it gave poor results as I wanted the photo's original background to zoom as well. If you have defined a mask you cannot zoom in or out with the whole picture.
The SFX track lets you add text bubbles with comic captions and place them in the foreground or background. You can add any of the predefined shapes or import your own, like glasses or hats. I searched for pictures of hats online and most of the pictures I found were on a white background, but as the program couldn't set the white colour to be the mask, I had to paint over it every time. If your image is a PNG or Targa file with a transparency layer, then this is automatically taken as the mask, saving a lot of time, but most users would not think to convert their images with a graphics program before importing them. You can change the size and the position relative to the model. If you have added a movement to the model's head and added a hat, the hat will stay in the correct position on their head. If you think that the controls take up quite a bit of space then you would be right, but you can preview your animation by changing to full screen mode, with the space bar stopping or starting the animation.
The special effects you can add to a project are mainly cartoon-like animation. You can download other packs or even other pictures to use as models from the Reallusion website, but they all cost extra, between $15 to $25. In fact, there is little incentive to register the product, as you don't get any bonus material for doing so. You can upgrade the standard version of the program for free, but you have to register in order to upgrade the Pro version (well, that's what happened when I used the 5.1 upgrade on both products). An error on the page meant that when I registered online I have to select a state, even though the country was set to UK, and a question "Do you purchase online", had a tick box marked "Ja".
All of the tracks allow you add content in a cumulative manner, so you can animate a small part of the Timeline, and then add to the track. The different parts can be moved along the Timeline, and you can lengthen or shorten the time the effect or movement takes. You can spend a long time adding movement and effects to the Timeline to get something that looks good. One tutorial says that you can create a music video in ten minutes, but you should at least triple that time if you want to get a good result. Having said that, I rarely referenced the manual, which means the program is easy to use. Mind you, when I do access the help from the program, it takes me to their website to show the pages, as no guide is included in the program.
Once your animation is complete, you can use the Output button to create a file, but this can cause problems. Using the Video tab, I tried to create an avi file and used the DivX codec (which is very popular these days and produces small files with good picture quality) but the file caused Windows Explorer to crash every time I tried to play it. As I had plenty of hard disc space I had to create an uncompressed avi file, and these use another program to create a DivX file. With the Web tab, you can save a Flash flv movie file and the program will generate the HTML page as well, but not to W3C standards. If a page is coded to the W3C standard then it should view correctly if the web browser you use also complies with these standards (Internet Explorer doesn't quite do that yet, but that's another issue). On the page the program creates the movie is stuck in the top left hand part of the page, so I had to tweak the code afterwards to position the movie in the middle of the screen, and add some text.
Most of the output tabs allow you to change the resolution of the final file and the frame rate. The Mobile tab produces an MP4 or 3GP file. The Image tab lets you save your animation as a sequence of BMP or TGA images, but as a minute's length at 30 frames per second will produce 1800 frames, that might be a bit too much.
One drawback is that you can only animate one person per photo. If you have a dialog between two characters, and there are two on the screen, you can only animate one. The only way around this is to split the picture in two, animate each character individually, create a video of the result and then use some video editing software to join the files side by side (or flip between the images).
The program interface is completely non Windows, apart from when you import a picture. This uses a normal Windows dialog with a picture preview. Every other action uses a redesigned dialog, which is intuitive, but when loading or saving your projects you have to browse to a folder each time. You can't just click on 'save' once you have named your file, you have to browse to the location anytime you save. I do not know why developers think that the standard interface is so bad that they have to redesign it.
The original black model from version 4 has been removed, which is a shame as it worked very well, but you can load it into version 5. I found a picture of the face online and when I loaded it into the program it found the anchor points automatically without having to assess the face. Maybe there was some additional information saved in the jpeg file. There are several models including a blonde woman, newsreader, child, cat, cartoon dog, lion, frog and others. Apart from most of the animals, they are cartoon like, and after using the program for a while I can see why. The animation it produces is not life like and using pictures of real people or animals in the program will just make them look comic like, but maybe that's the point of the program. It doesn't produce animation similar to Pixar or Dreamworks, but something that is a bit of a laugh. There are quite a few videos posted on YouTube made with this program, but the better ones have used other video editing software to tweak the original footage.
The standard version is priced £29.95 while the Pro version is £89.99.
You can see examples of what can be done with the software at this Ozzy Sings link or this Tom Speaks link.
Back